
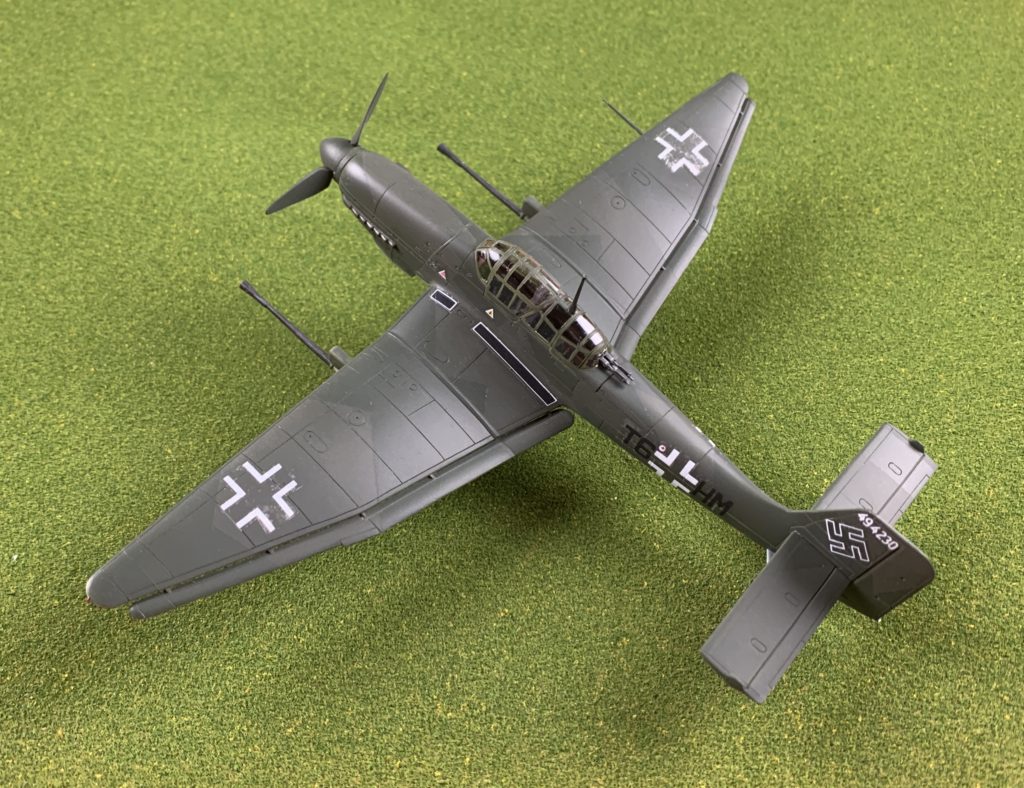
Junkers Ju-87G-2 Stuka, T6+HM, StukaGruppen 2, 1945

I acquired quite a few bottles of Mission Models Paint from a vendor who decided to stop carrying the line. Because Dr Miller at Model Paint Solutions reviewed these as “best model paint ever” and the colors are considered very accurate, I wanted to see for myself, as a profoundly average modeler.
Our Club’s theme for September was “Achtung Stuka!” Since I had this old Fujimi kit in my stash I decided it would be a decent test.
The Subject
By 1943 the Ju-87 Stuka had become completely obsolete unless operated with aerial supremacy or at the least, local aerial superiority. It was slow, not very maneuverable, and anti-aircraft artillery was good enough to easily remove the Stuka as a threat. Even so, it was a stable and accurate bombing platform.
The G model of the Ju-87 was based on the D with a view towards primarily become a heavy cannon platform to be used against medium armor and soft skin vehicles. The G-1 used the same wing as the D but wing loading was considered too high so the G-2 was developed with a longer span and cleaner wing, the wing machine gun remnants having been removed. While the G models could be reconfigured in the field to drop a 500kg this appears to be rarely done.

The Model
The Fujimi kit represents the later G-2. It does have some unused parts that obviously come from the earlier D-1/2 kit. As a model it is quite nice, even by modern standards for this scale. Panel lines were quite finely recessed and the canopy is very clear. Typical of Japanese manufactured kits of its era, the cockpit is rather sparce with just the seats for the pilot and gunner, an instrument panel and the armored panel behind the pilot. Given the canopy cannot be opened up without some surgery this is not a problem. I did add masking tape seatbelts to both seats and these are just visible through the framing.
Construction was straightforward and easy, I did not have any difficulty with alignment or gaps. I left the prop/spinner off until last because I wanted to be able to paint the forward fuselage without risking glue later, and I no longer care if the prop spins.
Some care was needed when gluing on the cannons and the fiddly bits like the antennas and the bomb cradle attachment. I decided to use 3 minute epoxy to both ensure a solid join after painting (so to not ruin the paint) and getting a jig properly set up was a bit time consuming but it did pay off.
Mission Model Paints
MMP is a water based acrylic. It cannot be thinned with anything other than the Mission Models thinner, or water. Believe me, I tried. Any other thinner medium turned the paint into a lumpy goo. Let me repeat myself, do NOT attempt to use any other thinners other than Mission Models Thinner, or water.
I first tried pre-mixing some thinner + MMP primer. This was a mistake. Don’t do this. The thinner reacts with the paint to begin the curing process and you must start painting immediately. I had to throw out the pre-thinned paint later the same day because it was essentially a semi-hard blob. Imagine a soft rubber ball with no bounce.
Next, I tried pre-mixing the polyurethane additive (also by MMP) with the thinner in order to get that ratio right. Nope. It hardened up even quicker and harder. I guess that’s a good testament to the hardness of the paint when using the poly additive.
After a few fails I decided to test some thinning ratios on some plastic spoons. Turns out a 4:2:1 ratio of paint:thinner:poly seemed to get a good hard result with the primer and paint, but it did not spray smoothly with a bit too much tip dry. I then tried distilled water as a thinner and the paint worked in the same ratios but was not very resilient. Obviously the thinner has a chemical in it that likes to work with the paint and/or poly.
On the recommendation of Dr Miller (Model Paint Solutions) I decided to add flow improver and retarder from Liquitex to my distilled water. I tried 5% by volume of Slo-Dri and Flo-Aid to the water. This improved the resilience of the paint finish indistinguishable from the application using Mission Models Thinner. This is good because their thinner seems to be difficult to get except for some online stores with some rather high shipping prices considering the size of the thinner container.

After all that experimentation with plastic spoons, I was ready to apply some primer and paint to the model. Since I had some Mission Models Clear Primer, I decided to mix that 50:50 with MMP RLM 65 Light Blue then put that in my cup with thinner (water + flo-aid + slo-dri) and poly at a ratio of 4:2:1 paint:thinner:poly at a pressure of 20 psi using an Iwata Eclipse with a 0.3mm needle. It sprayed nicely and while coverage was a bit thick I was assured by my testing that it would level out and shrink as it cured. It did.
After letting the paint cure for 24 hours (I’m a slow builder this way) I masked the lower surfaces and painted the MMP RLM 71 Dark Green as before. Again I let that cure overnight and then masked the splinter pattern and sprayed the RLM 70 Black Green. Since I did not need to wait for a full cure I allowed an hour for the paint to dry then peeled the Tamiya masking tape off. Now the real problems began.
The paint lifted but not consistently. Which I hazard to say is a good thing. The light blue lifted in a couple of places as did the dark green in others. On my first fix attempt I masked and reshot small amounts but the masks lifted paint in other areas. In some cases, the black green lifted from the dark green but the dark green remained stuck to the plastic. Hmm. I’m certainly NOT going to mask yet again and lift yet more paint!
I then tried simply touching up the lifted spots. That actually worked! In every case using thinned paint (I just added a drop of my thinner to a palette with a drop of the paint) to touch up a small spot of lifted paint it blended nicely into the existing paint. Okay, that’s a nice feature.
Decals
I did not have any spare Ju-87G decals. All my spares were for the earlier B model which were a bit more colorful for a 1945 bird. So, of course, the kit decals were in poor condition given the age. As usual I first applied the decals under the wings so that if I had issues they would be out of sight. Other than a slight wrinkling on one everything worked well. Just knew from that point to use a much weaker setting solution.
Next was the simple crosses on the wing upper surfaces. Applied and a little solution left on them. However when I returned they had curled up and attempting get them to lay down simply destroyed them. Note to future self: watch them closely as the water/solvent dries. Since I do have some simple crosses on a generic sheet from Microscale (albeit 30+ years old — don’t keep decals for that long kids, it’s not safe). I cut those out and attempted to apply those. They disintegrated. Just a bunch of little white bits I had to clean off the wing. Luckily, I also have some Liquid Decal Film. A quick fix later and I had the upper surface crosses on.
The remaining decals went on with less fuss, mainly because I watched them closely as they dried. I did occasionally add some medium strength solvent but would wait only a few seconds then use a cotton bud to roll the decal flat. They did not settle completely but it was good enough at this point given all my other issues. I was ready to get across the finish line.
Summary
Every modeling project has what I believe to be 5 parts:
- Research
- Construction
- Paint
- Decals
- Weathering
During the paint and decal phases I came close, multiple times, of just binning this model. Even though it was actually easy to build. I skipped the weathering but of course reserve the right to revisit weathering in the future.
The Mission Models Paints are a bit of a PITA. The color may be very good but the prep and care needed to make it work is likely not a value for some modelers. I have quite a bit so I will continue to work with it and frankly “figure it out.” I liken it to trying to make Vallejo work with an airbrush — with the right additives in the right ratios it can be made to work, and work well. One thing I changed that seemed to improve performance greatly was using distilled water with Liquitex additives as my thinner. The other change I’ll make for the future is with the primers.
Finally, old decals suck. I’m going to avoid them in the future even if it means my wallet has to feel that pain.