
Pre-shading
I’m not one to typically weather, or pre-shade, or post-shade my models. I’m not looking for a miniature replica so much as a small model…hmm. So why try pre-shading? Well frankly it’s because I’ve never done it before and while I’ve seen it done beautifully on other models I wanted to try for myself.
I’ve been drilling Scott Samo on his technique over the last few months; Scott is a master modeler who has won a few regional and national IPMS competitions with his modern day jet models. His technique is to lightly pre-shade in a dark color, like black, along the panel lines and any other area he wants to highlight. Then he takes the color and mists very light and thinned coats until the color builds up to achieve the look he desires. The key, says Scott, is very thinned paint and lots of patience.
Since Scott is a fan of Gunze acrylics, I decided to make my first attempt using Tamiya acrylics (they are very similar paints, and I don’t have much in terms of Gunze, but I like Tamiya very much). I mixed 1 part paint to 14 parts thinner using pipettes. For my initial try I am using Tamiya XF-13 Flat Aluminum, thinned using their X-20A thinner. Since my subject is overall High Speed Silver, I figured this would be both a good test, not too difficult with multiple colors, and it would help break up the monotonous 1-color scheme.
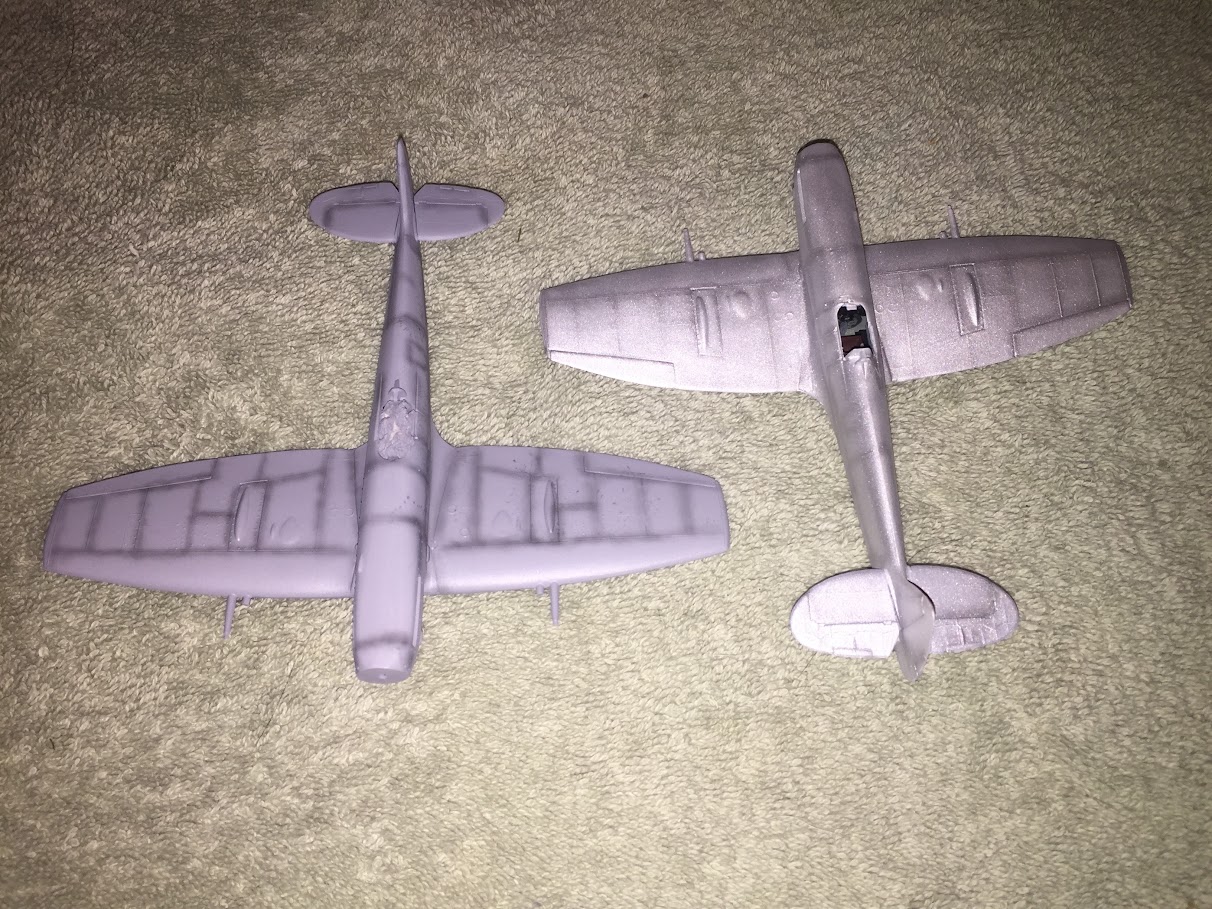
On the left is a primed and pre-shaded model, and on the right is a painted model that was pre-shaded just like the one on the left. This method works, but it does take a very long time. I had to fiddle with my airbrush for quite some time to get the pre-shading to work right. First, the airbrush — I’m using a H&S dual action airbrush with a .2 needle so that I could get a very fine line. Secondly, I decided to thin the Tamiya XF-3 Flat Black paint just like the color coats: 1 part paint to 14 parts X-20A thinner. It took me some time to get the needle and pressure adjusted properly to ensure consistent application of the paint without it pooling, or running. The final working pressure was set at 25 psi at the compressor, and I’ll note that I have a long hose from the regulator to the airbrush to ensure even flow. It likely also means a bit of pressure loss. The H&S has a limiting screw on the back of the brush that allows me to ensure the needle only opens so much; and I essentially kept opening it from fully closed until I could get a very faint bit of paint to flow, holding the brush about 1/2 inch from the model. The lines were about 1/8 inch wide, and a bit squiggly as my hands don’t remain as still as I’d like, but it worked. Oh, and I had to keep the brush moving or it would pool.
By having the pre-shade black heavily thinned, it allowed me to build up that color so that it started a very light gray, until it was a dark gray to black. On the negative side, it took a long time to build up, which meant a lot longer at the paint booth than normal. The color coat took 3 sessions of about an hour. Yes, that’s a very long time for me to stand at my paint booth. The H&S has a small color cup that I filled 4 times from my pre-mix of thinned paint. My hand actually got a cramp in it!
I’ve got a second model being painted, actually on it’s second 1 hour session, but the color is an enamel. I’ve found I don’t like using an enamel as it appears to be attacking the primer and other coats underneath. So while I’m using a thinned mixture, I’m finding I spray lots of just air on the model to evaporate the mineral spirits carrier and quicken the drying. So on the second session I doubled the paint making it a 1:7 thinning ratio. The color is also getting darker than I’d hoped, so I may be switching to a lighter color to finish. I’ll complete the paint job as planned, but not decal it until I’ve had a chance to either let the color grow on me, or redo it.
Summary
Using my wife as a disinterested 2nd party, she admitted that she likes the depth the pre-shading adds. I’m not sure yet as the model looks too “dirty” for a post-war machine that likely was well maintained. But then again, it wouldn’t be monochrome, either. I’ll finish this with some decals and if I decide later I don’t like it, I’ll replace it.
Thanks for looking…